
 Hello All!!!
I know it's been a while since the last time I updated the blog, however many things have been going on in my FB Page.
Golden Demon UK is just around the corner and this is the period of the year when we are all stressed trying to finish our entries, and trying to find a good idea to give them that extra boost to make them stand up from the rest of the competitors.
One good option (that I always choose for my entries) is to put some kind of title label in the base to establish a background for the entry.
During the last years many people have asked me how I prepare the labels, so now I have done a simple tutorial to share with you :-)
Enjoy!
Step 1: Design.
Using Microsoft Word we can create the design of the label. I use black background and white letters, but any other option will do the trick as well.
The most important thing here is that the text is flipped and "readable" from right to left.

Step 2: Printing.
Once we are happy with the design we print it in a sheet of transparent paper.
The best results are delivered with a LaserJet printer. You can use InkJet, but the paper has to be very specific and the ink can be removed easily by accident...

Step3: Painting.
With the airbrush and the Tamiya Gold (X-12) we have to paint the back of the label. Why the back? Because it is where the ink is and the paint will keep it fixed.
We can use a normal brush and a normal acrylic paint, however...... the result will be poorer and not clean


Step 4: Cut the label.
(Do you really need an explanation for this?)

Step 5: Label + Plasticard,
Once the paint is dry, paste the label into some flat plasticard (I use the 1mm thick one) using PVA glue.


Step 6: Cut the plasticard
(Ad again no need for explanations...)
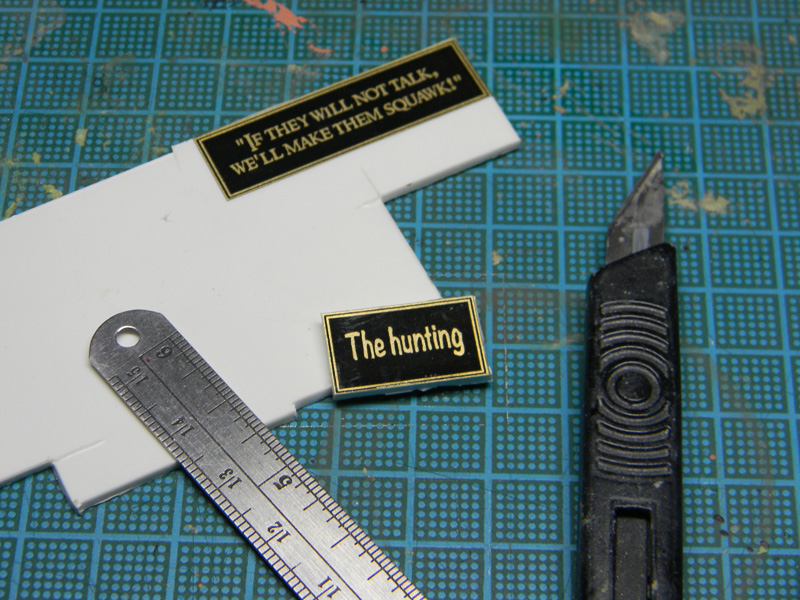
... et voilà
As you can see this technique is not difficult at all, however it requires a bit of practice, so do not despair in case you do not achieved the desired results at first.
Greetings!
D.
Grandísimo tutorial, mil gracias!
ReplyDeleteMuy bueno David!!
ReplyDeleteUna pregunta David, la hoja tuya es totalemente lisa?? esque la que me vendieron ami lleva como un mini relieve y a la hora de imprimirla las lineas no salian totalmente rectas :/
ReplyDeleteun saludo y magnifico trabajo
Hola Jorge,
DeleteAmbas hojas (tanto la transparencia como el plasticard) son totalmente lisas.
Las que tienen un poco de relieve o granularidad son las transparencias para impresoras de chorro de tinta, pero el resultado que dan a mí no me convence en absoluto.
Suerte!
Why not print it, laminate and glue?
ReplyDeleteHi Steve.
DeleteThat could be another way to do it.
I am showing here the way that I use and suit to me the most, but I am sure there are plenty of ways to prepare the labels :-)